Garden Design – Elevations
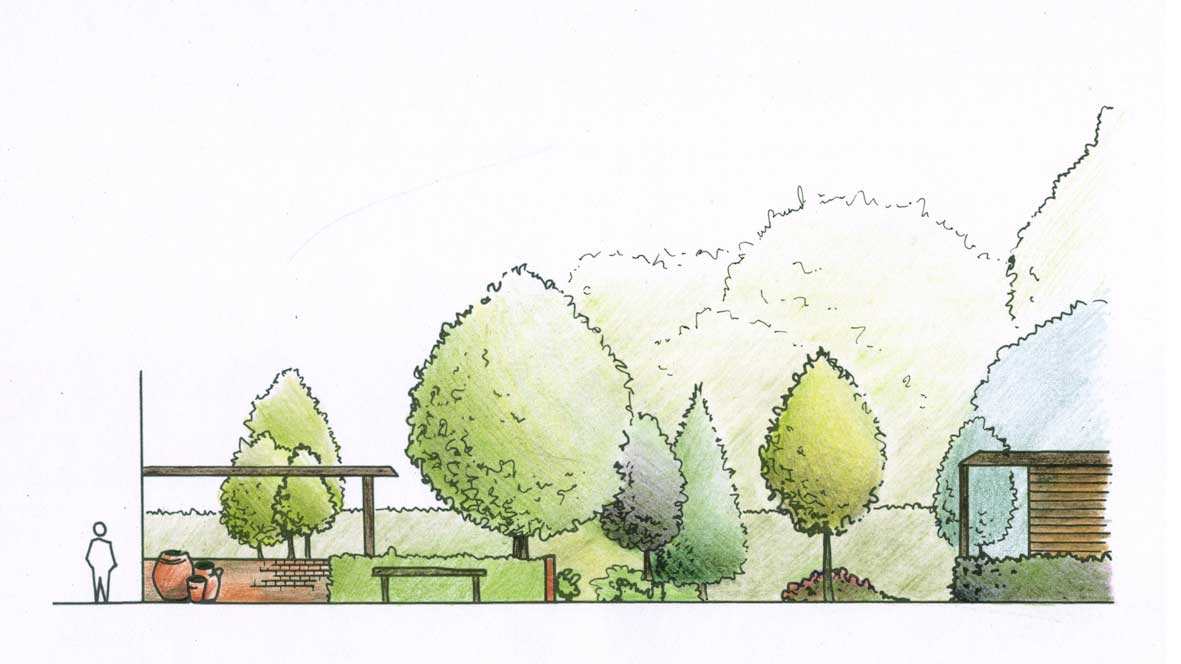
As part of my garden design course (which finishes in 3 weeks), we have to include an elevation of the garden we have designed. On Friday, I finally forced myself to attempt one and here it is. It’s not the final version as there are a few errors but definitely good to practice. Check out my ‘colour rendering’ techniques too (yes, that is design speak for colouring in!).
Also, note the sudden appearance of trees in the background on the colour version. The garden (and surrounding gardens) have a backdrop of mature woodland and I think the inclusion of these in the elevation just adds a bit more depth.

Hyde Park Community Orchard Mosaics

Toad
I’ve only just got round to photographing (and uploading) some of the finished mosaic elements from the Hyde Park Community Orchard public artwork. The insects, birds and animals shown here are just a few of the mosaics created for the seating, wildlife discovery trail and pathway to the Orchard, all contained within an apple pip shape that formed a connecting element throughout the artwork.

Wasp

Swift

Red Admiral Butterfly

Nuthatch

Greenfinch

Honey Bee

Colshaw – The Return

Following on from last year’s art project in Colshaw, myself and fellow artist Richard Dawson were asked by Cheshire East Council and Lime Art to return to the estate to run another project with the same group. Last year’s project focused on creating artwork for part of a concrete wall on the edge of the park. As the wall is (very) long and fairly unattractive, we decided it would be good to continue with this theme and create more artwork for the same wall.
Despite numerous and repeated predictions that the original artwork would get vandalised, only one part got burnt (a letter ‘S’ that was wrapped in varnished string) which was quite an achievement. As part of the second project, we were also asked to replace this ‘S’.
We worked for several evenings with the group of young people to come up with ideas and concepts for what the artwork could be. Then, during the October half-term we worked for three days to produce the work, which involved creating designs, large-scale drawing, using the fret saw to cut the shapes, sanding, painting and adding final detailing. Each group member produced a large scale ‘character’ that they drew, cut out of plywood and painted. We then took them away to varnish (the horrible, toxic, smelly bit) and brought them back to install on a freezing cold Saturday with the help of Steve from local housing association, Riverside.
As ever it was a pleasure to work with this group of young people from Colshaw. Their energy, enthusiasm and interest in the project made it an incredibly satisfying and rewarding project to work on. Yes, the group require a fair amount of discipline and control and it is hard work but the kids from this estate are some of the best I have ever worked with and I would choose to work with them again in an instant.


My post ends here. If you can see an advert under this text – please ignore it. It is WordPress’ policy to ‘occasionally’ place ads on blogs. This advert is inappropriate to my readers and blog content and I am currently trying to get WordPress to remove it. If you have time, please email support@wordpress.com to complain. Thankyou!
Work on the Hideaway Garden starts
It’s been a long time coming but we’ve finally got planning permission to turn a small parcel of land into a community garden in Farnworth, Bolton.
 Initial clearing and digging of pathways was done by a group of fabulous Prince’s Trust lads. We then got Ambec Fencing to come along and install a new fence along the front and back borders of the property. The right hand-side faces onto a cricket club and on the left is Bolton at Home residential housing.
The project has been funded by Symphony Housing and is going to create a garden filled with lots of things including a playhouse, raised beds for growing vegetables, composting area, sitting areas, flower beds and fruit trees. However there’s lots of digging and landscaping to be done first made much harder by the fact that a rubbish tip and half a housing estate seems to be buried under the ground! Digging goes something like this… put your spade in an inch, hit something, dig around the two bricks you’ve struck, remove them, try putting your spade in again, hit something different this time, discover a black bin bag of rubbish, dig it out, try again and hey presto – you finally get to something resembling soil!
We’ll also be creating some art with local communities to put in the garden – this is likely to include mosaics and withy sculptures. Alongside this, we’ll be creating a film about the process which will include some timelapse. some animation and also some interviews with our willing volunteers and other local people.

Hyde Park Community Orchard Artwork – installation
Just before the build fortnight on the RHS Tatton show garden, I had 10 days in the rain (plus one dry day) installing artwork in the Hyde Park Community Orchard. Not ideal weather for installing a mosaic which is mounted on paper but we soldiered on and (almost) got everything finished.
 First job was a dry fit of the classroom floor mosaic to check it all fitted together onto the 3m concrete base. The mosaic was separated into 27 sections, so it took a bit of work to make sure it all went together as it should.
 Laying out the mosaic and cast stone ‘apple pip’ inserts for the Wildlife Discovery Trail sculptures…
 Then the rain started…
 We got the mosaic wording in on a dry Sunday with the help of Des…
 But at one point we had two gazebos and three tarpaulins over the mosaic and they still weren’t enough to keep the rain out.
 Richard Dawson was also installing his oak benches and banquet table at the same time. These were the holes for the foundations of the banquet table to sit in. There’s about a foot of water in them here… another couple of hours and they were full.
 Still smiling… or is that grimacing?
Next Hyde Park Community Orchard post – the finished artwork!
RHS Tatton – Silver Medal!

Following two weeks of hard slog in the rain at the RHS Tatton Flower Show, we have been awarded a silver medal for our show garden ‘A Year in the Life of the DreamScheme’. The culmination of 12 months of work and preparation, the garden shows the young peoples’ journey through Spring, Summer, Autumn and Winter using colour, texture, planting and artwork to recreate the seasons.
Myself and Peter Castle worked with young people from New Charter estates to interpret their ideas and designs and turn them into a show garden. Using a circular format as the starting point, we designed each section to represent one season looking at overall effect, impact, the relationship between the seasons and plant associations. Our final plant list included over 100 different types of plants totalling almost 1000 individual specimens.
Once on site, the hard physicial work began, with the hard landscaping and building happening first, followed by laying out and lots (trust me – lots) of digging, then planting. The finishing touches included placing all the artwork made by the young people (mosaic slabs, withy sculptures, Colin the mosaic corgi etc), checking over plants and trees and dressing the garden.
Achieving a silver medal for a first attempt at a show garden is a massive achievement, so we are all incredibly pleased. New Charter received a bronze medal for their first show garden in 2010, so the pressure was on to gain an equivalent or better rating!
Next year, we thought we’d give the silver gilt medal a miss and just go straight for gold..!


The Big Green Recycled Queen
Myself and Richard Dawson worked with local kids to make this amazing sculpture to celebrate the Jubilee in Hyde Park, Manchester. We made it in one day and everything is made from recycled materials (except for cable ties, brown tape and plastic tags).
The milk cartons mostly came from The Flying Teapot Cafe at Woodend Mill and the bottles from New Charter Housing Association. A few of the group worked all day on the sculpture with others dropping in and out throughout the day.
Here’s the finished Queen after we had a mini-coronation…

Hyde Park Community Orchard mosaics – the next stage
All the mosaic fruits for the outdoor classroom mosaic floor are completed to the first brown paper stage. Here are the parts I’ve been doing…

Next week, we’ll be laying it out and, once we’ve reversed the completed parts (so they’re back to front), we’ll be starting on the fill-in colours using unglazed procelain tiles.
Mosaic lettering test panels – Hyde Park
As part of the Hyde Park Community Orchard artwork, we’re creating a 3m diameter circular mosaic. This will form the central part of the outdoor classroom and is a substantial part of the commission. Part of the design is a circle of text that includes all the names of the fruit trees planted in the orchard.
I’ve created some test panels of text to see if the style/font I want to use is achievable and that it isn’t going to be too time-consuming to create almost 200 letters from mosaics. As the lettering on this outer ring of text is only 50mm high, there’s not a lot of room for error but the most fiddly bit proved to be filling in the background colour.
The second panel is the test piece for a central ring of text that reads ‘Hyde Park Community Orchard’. This will be done in the same font but is slightly bigger with 80mm high lettering.


