Working with children: mosaic workshops
I’ve just finished a set of mosaic sessions with a group of 16 eight to fourteen year olds. I thought it might be useful to provide others with some tips and observations for working with children on mosaics…
The mosaics we were creating are eventually bound for RHS Tatton so needed to be suitable for exterior use – adding a further complication – eight year olds and cement-based adhesive in a carpeted room (gulp) just don’t mix!
Tip 1 – Draw the designs first. You can get the group to come up with some designs in an initial session but I’d really recommend taking these away and translating them into drawings suitable for mosaicing – ie. simplifying them, getting them to the correct size and outlining in a nice thick pen.
Tip 2 – Make the drawing/design smaller than the FINAL size. If you’re working to a specific size always bring the border / edging line in by 20mm ish. Regardless of how many times you tell them, the kids will always go over the lines rather than up to them so you need a bit of extra space – you can always add extra pieces around the edge if necessary.
Tip 3 – Use the double indirect method. You can look up this process in any good mosaic book or on t’internet but you basically work with brown paper, watered-down PVA and the mosaic tiles in the group sessions, simplifying the process and removing hazardous materials from the workshop. Draw designs onto brown paper and then stick the mosaic tiles (facing up) onto this with the PVA. This will create extra work for you in the long run but removes the need to use cement-based adhesive with the group. Changes and errors are also easily rectified as the tiles have only been stuck down with a weak PVA mixture. However, if doing interior mosaics I’d just use the direct method and stick directly to your mosaic base with a strong PVA.
Tip 4 – Use pre-formed mini-tiles. Of course this is a matter of personal choice and the style you are aiming for but I have found using pre-formed tiles much easier and safer to use in workshops with children, especially those 12 and under. This does create limitations in terms of shaping etc but there are a great selection of tiles available – not just the 10mm square glass vitreous tiles. You also don’t need to worry about safety goggles, flying shards, sharp edges, cuts and pinched fingers!
Tip 5 – Sort the mosaic tiles into groups of colour. Don’t try and keep all the tiles in individual colour and type order. It won’t work or will drive you crazy sorting them out at the end of the session. Instead have big trays of reds, greens, blues etc – the kids will enjoy sorting through to find the tile / exact colour they want and they are much easier to keep sorted.
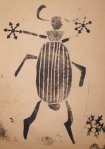
Tip 6 – Use a single colour to edge shapes. Depending on the subject of the mosaic, I have found it works really well to edge items within the mosaic picture with a strong contrasting colour. For RHS Tatton we created mosaics of bugs and some of them were such a celebration of colour(!), they needed a strong line to define the bug from the background. Again, this is personal choice but does help if you find the main focus of the mosaic is disappearing amongst the surrounding colour.
Tip 6 – Give your group some basic guidelines. It’s easy to take simple mosaicing techniques for granted when you do it a lot – what seems obvious to you won’t be obvious to the group and it’s worth giving them some easy rules to follow. Include: leaving a gap between the tiles, not using too much glue, sticking the tiles the right way up and keeping the tiles on one level (ie. don’t build them up in stacks).
Think that’s probably it for now, though I’m sure I’ll think of some more…
Depending on age and ability of group, it’s nice to include them in the grouting though I’ll usually do the ‘sticking on’ stage using the cement-based adhesive myself. If you are going to get your group grouting, they’ll need gloves and possibly masks.
Hyde Orchard Creative Sessions – Day Three
Block printing and paper mosaics on the menu today…
We had a school gardening group in the morning and trainees from the Park Cafe in the afternoon. The Cafe provided us with a lovely buffet and afternoon tea and cakes!


Hyde Orchard Creative Sessions – Day Two
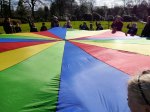
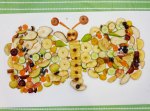
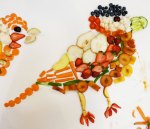
Beautiful sunshine for our second day of creative sessions for the Hyde Park Community Orchard artwork. First, a game of Fruit Salad outside with a massive parachute, then inside for workshops with two consecutive groups of 30 children from Flowery Field Primary School. The groups created lots of mosaics – made from fruit (and veg) and also paper.


RHS Tatton – mosaic workshops
This year I’m working with New Charter on their show garden entry for the RHS Flower Show at Tatton Park. New Charter works with residents and young people from their ‘Dream Scheme’ groups to create a garden for the Flower Show – two years ago their entry won a bronze medal so the pressure is on!
I’m working with young people to create different pieces of exterior artwork for the garden including mosaics, withy sculptures and painted pebbles. For the past three weeks I have been working with a group to create bug mosaics to make paving slabs.
We started off doing some designs and drawings of bugs and insects and also practicing how to make mosaics. We’re using the double indirect method, so the group are sticking their designs onto brown paper ready for transfer. I have found this is by far the best method to use when working with young people as it removes the need to use potentially hazardous grout and cement adhesive. Have a look at the work in progress…


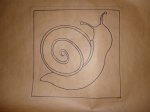
Mosaic Snail
As part of the prep for the RHS Tatton workshops I’m currently doing, I created a mosaic paving slab of a snail as an example for the group. Here it is at the first stage of making…


Success! Hyde Park Community Orchard Artwork…
Last year myself and two other artists (Ann Gilligan and Richard Dawson) were successful in gaining a commission to create artwork (pending funding) for the Hyde Park Community Orchard in Hyde, Greater Manchester. Just before Christmas we found out the Community Spaces funding bid had been successful and we have now started the project.
The artwork will include an outdoor classroom, a wildlife trail and an entrance feature all informed by work produced in sessions with local schools and community groups. The final pieces will feature a number of different techniques and materials including wood, cast-stone and mosaics.
There are lots of other things happening in the Orchard so keep an eye on the Operation Farm blog for more details. I’ll also be posting about the ‘art’ side of things regularly!
Working with your local partners and organisations
I’ve just been to a local youth partnership meeting and it’s caused me to reflect on the benefits of getting involved in your local community – in both a personal and professional capacity. At the meeting this afternoon were: councillors, representatives of the (very active and successful) residents association, housing association regeneration and community staff, youth workers / senior managers and various other bods, including me, an artist.
I’ve found getting involved and being active in your local community is a great opportunity to meet, not only local commissioners of community arts but also to develop stronger links, discover what’s going on in the area and gain advice and insight into projects and upcoming developments. Its also a good way of highlighting your own projects and activity and sourcing help and support for your own work.
On a personal note, I learnt about a gardening group that a friend might be interested in and that the Council are currently doing a consultation on local libraries and they haven’t had much response. So I’m off to the library this afternoon to wave my flag of support (not only is it brilliant for books but it’s a lovely warm place to work in too).
So – Tip of the Day: go to some local meetings. It might take up an afternoon when you could otherwise be earning money but it’s worth it to network and meet the movers and shakers…
Quite the Culture Vulture
Fellow Woodend Artist member and artist Pat Baker invited me to the theatre this week. We trotted off to see ‘Two’ by Jim Cartwright at the Royal Exchange Theatre in Manchester. Starring (predictably) just two actors, Justin Moorhouse and Victoria Elliot, the play is set in a pub whereby they play the landlord and landlady and then a variety of characters / couples that come into the pub. Justin Moorhouse is well known for his role in Phoenix Nights (the guy that spends the whole second series with his face painted as a tiger) amongst many other roles and comedy parts.
I really enjoyed it (for all that I don’t often go to see ‘normal’ acting plays) but was very glad I wasn’t sat on the stage level seating where Moth the smooth ladeez man attempted to try it on with almost every single person. Very funny for the rest of us, though…
The stage design was very simple except for the chandelier that was created from a few hundred suspended pint glasses and tankards. Looked great with the lighting and multiple piece suspended artwork is a format that always hits the spot with me. I can’t find a picture of it but the designer was Amanda Stoodley. Instead of an image of her work, here’s an image / detail of my suspended artwork…(dodgy connection, I know)

Together We Are Greater - suspended origami artwork by Jacqui Symons
The Colshaw Art Project

Way back in October, I commented on a project I had recently finished on the Colshaw Farm estate in Wilmslow, Cheshire. More on this now…
The Colshaw Art Project was a pilot 8 week project initiated by Cheshire East Council and Lime, the arts and health organisation based in Manchester. Working with three artists, the young people from the estate would create some kind of public art for a long concrete wall in the park or ‘ramps’ as it’s known locally.
Myself, Kim Wiltshire and Richard Dawson started with a basic idea of creating some kind of lettering, possibly 3D, possibly using recycled materials but with the knowledge that we weren’t allowed to do ‘graffiti’. We ended up working with a group of challenging but enthusiastic young people aging from seven to 16 years, predominantly girls but some older boys too. They needed a lot of encouragement and support, which led to us really having to structure the workshops and think about behaviour management, health and safety and the logistics of working with 12-15 young people in a restricted space.
We started the workshops with a run through of The Rules (which they had written) and included obvious things such as ‘No Shouting’ and less obvious things such as one group member not being allowed to bite people…
Every week we ensured we had a diversionary activity whereby group members could stop what they were doing and move onto a different activity if they felt a bit restless. This was facilitated by students doing a community arts course.
We ended up with a fantastic bit of art that was created by young people from the estate from start to finish. They chose the word ‘Colshaw!’, they designed the letters from the shape to the decoration, they constructed the 3D forms, used drills, painted each letter and helped prepare the wall. They achieved a huge amount and should be proud of the finished artwork.


