Hyde Park Community Orchard Mosaics

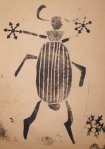
Toad
I’ve only just got round to photographing (and uploading) some of the finished mosaic elements from the Hyde Park Community Orchard public artwork. The insects, birds and animals shown here are just a few of the mosaics created for the seating, wildlife discovery trail and pathway to the Orchard, all contained within an apple pip shape that formed a connecting element throughout the artwork.

Wasp

Swift

Red Admiral Butterfly

Nuthatch

Greenfinch

Honey Bee
Mosaic lettering – timelapse
I should have posted this ages ago but have only just worked out how to embed video in to my blog!
This shows the first stage of making the outdoor classroom mosaic floor. The method being used to create the mosaic is the double-indirect method, whereby the tiles are stuck onto brown paper and then reversed ready for installation. The fill-in and background colours are added once the detail has been reversed. To give you an idea of how long the mosaics took to create, the word ‘Merryweather Damson’ which is being created in this time-lapse took about 1 day to complete…
Hyde Park Community Orchard Artwork – installation
Just before the build fortnight on the RHS Tatton show garden, I had 10 days in the rain (plus one dry day) installing artwork in the Hyde Park Community Orchard. Not ideal weather for installing a mosaic which is mounted on paper but we soldiered on and (almost) got everything finished.
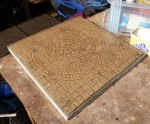
 First job was a dry fit of the classroom floor mosaic to check it all fitted together onto the 3m concrete base. The mosaic was separated into 27 sections, so it took a bit of work to make sure it all went together as it should.
 Laying out the mosaic and cast stone ‘apple pip’ inserts for the Wildlife Discovery Trail sculptures…
 Then the rain started…
 We got the mosaic wording in on a dry Sunday with the help of Des…
 But at one point we had two gazebos and three tarpaulins over the mosaic and they still weren’t enough to keep the rain out.
 Richard Dawson was also installing his oak benches and banquet table at the same time. These were the holes for the foundations of the banquet table to sit in. There’s about a foot of water in them here… another couple of hours and they were full.
 Still smiling… or is that grimacing?
Next Hyde Park Community Orchard post – the finished artwork!
RHS Tatton – Silver Medal!

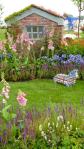
Following two weeks of hard slog in the rain at the RHS Tatton Flower Show, we have been awarded a silver medal for our show garden ‘A Year in the Life of the DreamScheme’. The culmination of 12 months of work and preparation, the garden shows the young peoples’ journey through Spring, Summer, Autumn and Winter using colour, texture, planting and artwork to recreate the seasons.
Myself and Peter Castle worked with young people from New Charter estates to interpret their ideas and designs and turn them into a show garden. Using a circular format as the starting point, we designed each section to represent one season looking at overall effect, impact, the relationship between the seasons and plant associations. Our final plant list included over 100 different types of plants totalling almost 1000 individual specimens.
Once on site, the hard physicial work began, with the hard landscaping and building happening first, followed by laying out and lots (trust me – lots) of digging, then planting. The finishing touches included placing all the artwork made by the young people (mosaic slabs, withy sculptures, Colin the mosaic corgi etc), checking over plants and trees and dressing the garden.
Achieving a silver medal for a first attempt at a show garden is a massive achievement, so we are all incredibly pleased. New Charter received a bronze medal for their first show garden in 2010, so the pressure was on to gain an equivalent or better rating!
Next year, we thought we’d give the silver gilt medal a miss and just go straight for gold..!


Hyde Park Community Orchard mosaics – the next stage
All the mosaic fruits for the outdoor classroom mosaic floor are completed to the first brown paper stage. Here are the parts I’ve been doing…

Next week, we’ll be laying it out and, once we’ve reversed the completed parts (so they’re back to front), we’ll be starting on the fill-in colours using unglazed procelain tiles.
Hyde Park Community Orchard – mosaics design
Here’s the final design for the mosaic flooring of the outdoor classroom in Hyde Park Community Orchard. At three metres diameter, its a fairly substantial undertaking but will look fantastic once completed. The design is inspired by artwork produced in creative workshops we facilitated with local schools and groups. Ann (from Green Monster Arts) and I have just started the making…

Mosaic lettering test panels – Hyde Park
As part of the Hyde Park Community Orchard artwork, we’re creating a 3m diameter circular mosaic. This will form the central part of the outdoor classroom and is a substantial part of the commission. Part of the design is a circle of text that includes all the names of the fruit trees planted in the orchard.
I’ve created some test panels of text to see if the style/font I want to use is achievable and that it isn’t going to be too time-consuming to create almost 200 letters from mosaics. As the lettering on this outer ring of text is only 50mm high, there’s not a lot of room for error but the most fiddly bit proved to be filling in the background colour.
The second panel is the test piece for a central ring of text that reads ‘Hyde Park Community Orchard’. This will be done in the same font but is slightly bigger with 80mm high lettering.

Mosaic Snail – completed
Realised I hadn’t posted a completed image of mosaic snail paving slab. Here it is alongside some images of process – dampening brown paper and then removing paper from mosaics before cleaning up grout. I suppose I should take one of it in situ too…


Working with children: mosaic workshops
I’ve just finished a set of mosaic sessions with a group of 16 eight to fourteen year olds. I thought it might be useful to provide others with some tips and observations for working with children on mosaics…
The mosaics we were creating are eventually bound for RHS Tatton so needed to be suitable for exterior use – adding a further complication – eight year olds and cement-based adhesive in a carpeted room (gulp) just don’t mix!
Tip 1 – Draw the designs first. You can get the group to come up with some designs in an initial session but I’d really recommend taking these away and translating them into drawings suitable for mosaicing – ie. simplifying them, getting them to the correct size and outlining in a nice thick pen.
Tip 2 – Make the drawing/design smaller than the FINAL size. If you’re working to a specific size always bring the border / edging line in by 20mm ish. Regardless of how many times you tell them, the kids will always go over the lines rather than up to them so you need a bit of extra space – you can always add extra pieces around the edge if necessary.
Tip 3 – Use the double indirect method. You can look up this process in any good mosaic book or on t’internet but you basically work with brown paper, watered-down PVA and the mosaic tiles in the group sessions, simplifying the process and removing hazardous materials from the workshop. Draw designs onto brown paper and then stick the mosaic tiles (facing up) onto this with the PVA. This will create extra work for you in the long run but removes the need to use cement-based adhesive with the group. Changes and errors are also easily rectified as the tiles have only been stuck down with a weak PVA mixture. However, if doing interior mosaics I’d just use the direct method and stick directly to your mosaic base with a strong PVA.
Tip 4 – Use pre-formed mini-tiles. Of course this is a matter of personal choice and the style you are aiming for but I have found using pre-formed tiles much easier and safer to use in workshops with children, especially those 12 and under. This does create limitations in terms of shaping etc but there are a great selection of tiles available – not just the 10mm square glass vitreous tiles. You also don’t need to worry about safety goggles, flying shards, sharp edges, cuts and pinched fingers!
Tip 5 – Sort the mosaic tiles into groups of colour. Don’t try and keep all the tiles in individual colour and type order. It won’t work or will drive you crazy sorting them out at the end of the session. Instead have big trays of reds, greens, blues etc – the kids will enjoy sorting through to find the tile / exact colour they want and they are much easier to keep sorted.
Tip 6 – Use a single colour to edge shapes. Depending on the subject of the mosaic, I have found it works really well to edge items within the mosaic picture with a strong contrasting colour. For RHS Tatton we created mosaics of bugs and some of them were such a celebration of colour(!), they needed a strong line to define the bug from the background. Again, this is personal choice but does help if you find the main focus of the mosaic is disappearing amongst the surrounding colour.
Tip 6 – Give your group some basic guidelines. It’s easy to take simple mosaicing techniques for granted when you do it a lot – what seems obvious to you won’t be obvious to the group and it’s worth giving them some easy rules to follow. Include: leaving a gap between the tiles, not using too much glue, sticking the tiles the right way up and keeping the tiles on one level (ie. don’t build them up in stacks).
Think that’s probably it for now, though I’m sure I’ll think of some more…
Depending on age and ability of group, it’s nice to include them in the grouting though I’ll usually do the ‘sticking on’ stage using the cement-based adhesive myself. If you are going to get your group grouting, they’ll need gloves and possibly masks.
Hyde Orchard Creative Sessions – Day Three
Block printing and paper mosaics on the menu today…
We had a school gardening group in the morning and trainees from the Park Cafe in the afternoon. The Cafe provided us with a lovely buffet and afternoon tea and cakes!